 A number of cameras now offer off-camera flash wireless control. This includes most Nikon DSLRs, all current Canon DSLRs and a number of Olympus models, including the XZ-1 compact camera.
The flash can be controlled from the camera without the photographer having to change the settings on the flashgun itself.
In complicated set-ups where the flash can be some distance from the camera, this is very useful.
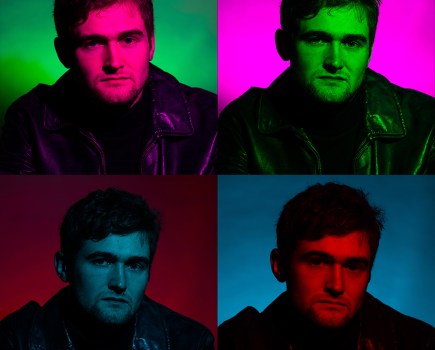
In this example of off-camera flash, a Canon EOS 7D is being used to control four flashguns using infrared. While all camera manufacturers offer proprietary flashguns, there are other options available from independent companies like Metz, Nissin and Sunpak.
On all flashguns, there are two main ways to change the output. The first is to use the manufacturer’s native through-the-lens (TTL) metering, which in Canon’s case is known as E-TTL. As with most metering systems, there are a few options available. It is easiest to keep the TTL metering set to evaluative, and to use flash-exposure compensation to make any adjustments. The EOS 7D allows up to ±2EV adjustments. The second option is to change the output manually, at up to 8EV difference.
A further option is to assign the flashguns to groups rather than control them individually. The EOS 7D offers up to three groups (A, B and C). Each flashgun can then be controlled simultaneously within its group. For instance, in a four-light set-up, two flashes lighting the subject can be set to group A, with two flashes in the background as group B. If the background is too dark, then all group B flashes can be boosted together in-camera using flash-exposure compensation up to 2EV. A flash output ratio can be set between the two groups, with one flash group up to eight times as powerful as the other.
To fire the flash via infrared, the pop-up flash must be up. Canon models are set to first curtain flash as a default, which means the signal is sent at the start of the exposure. The built-in flash can be turned off so it only sends a signal via infrared.

Armed with flashguns, you can achieve good-quality lighting anywhere. The flashguns are a lightweight option, too
How to Use Off-Camera Flash – Different Flash Options
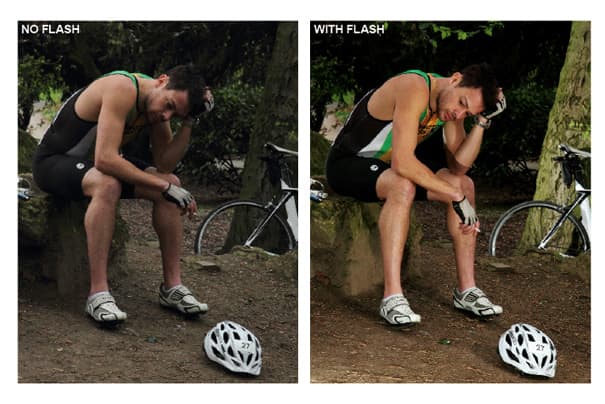
1. No flash

This is a scene at dawn, with the morning light just beginning to brighten the overcast sky. There is little light and without flash this shot requires a high sensitivity, fast aperture and slow shutter speed. This pushes the camera to its limits and so, the image quality is not great. More importantly, the lighting is not right: the light from above is casting large shadow areas on the subject. We need to use flash to brighten the scene and fill in those shadow areas.
2. On-camera flash

Shooting this scene using on-camera flash is not ideal for two reasons. The first is that the flash output combined with the distance from the subject means the lighting is limited. The second is that the light it gives is unflattering and casts some unwanted shadows.
3. One flash, off-camera

One flash, off-camera
For this shot I have set up a flashgun on a lightstand to the right of my subject and set it to slave, group A, and Canon’s E-TTL evaluative mode. This will give much more flattering light and balance out the shadows cast by the light above. However, this casts other shadows.
To reduce unwanted shadows, I have used a Lastolite softbox. Lastolite has a range of softboxes designed for flashguns (for more details visit www.lastolite.com).
4. Two flashes, off-camera

Two flashes, off-camera
I have set up a second flash on the floor between the subject and the camera, and set it to group B. I can now set a power ratio between groups A and B. As the second flash is meant to be used as a fill light to remove the shadows cast by flash number one, I set the power ratio of group A to group B as 4:1. This can be tweaked at any point up to 8:1. Also, it can be in favour of either group.
5. Four flashes

Two flashes, off-camera

Any of four channels can be selected to prevent accidental triggering of other users
The first two flashes illuminate my subject, but the background is now too dark .
I, therefore, have added another flashgun on a stand to the right of the tree (set to group B).
I then added a fourth on the rocks on the left (group A).
The two flashes illuminate the bike, and cancel out most of the shadows. The flash on the left also lights up the rocks a little.