Correct exposure is essential in digital photography, but it need not be a mystery. We show you how to get the best out of your DSLR’s metering, whatever the situation
 What is the correct exposure? That’s a question that has occupied amateur and professional photographers since Fox Talbot’s time. We all know what underexposure and overexposure mean, but how can you tell that you’ve got the exposure ‘just right’? The answer, of course, is that you can’t. ‘Correct’ exposure – just like ‘correct’ composition – is alarmingly hard to define.
Some photographers, like Ansel Adams, devoted their lives to developing a scientific system for correct exposure, while others, like Bill Brandt, eschewed such rules and followed the Surrealists in producing images that were emotionally, rather than scientifically, constructed.
But what is exposure? Can we count post-capture adjustment, in the darkroom or on a computer, as part of the process, or not? It is possible to extract a lot of detail from film that has been over or underexposed, and the same is true of a good-quality file from a digital camera. A skilful photographer can rescue a ‘bad’ exposure so successfully that it is impossible to tell that it was ever bad in the first place.
In this article you will find an explanation of how cameras measure light to determine the optimum exposure, and how you can use the different metering settings available on your DSLR, depending on what you want to shoot. The ability of a camera to capture a range of tones in a single image is critical to understanding exposure, and this is explained too, along with a quick guide to measuring your camera’s dynamic range and using it to your advantage.
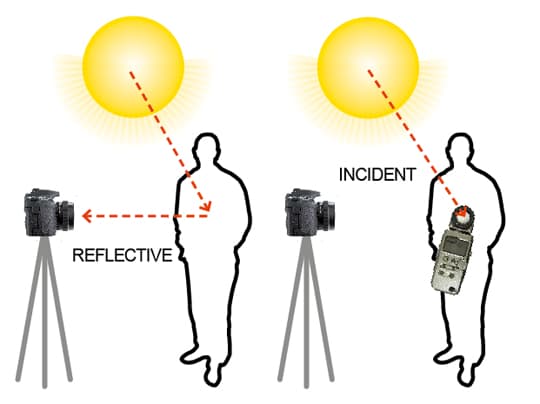
Incident and reflective metering

There are two main ways of measuring light in photography: you can measure either the intensity of the light falling on a subject, or the intensity of light reflected from it. These two types of metering are called ‘incident’ and ‘reflective’ metering respectively, and before in-built metering systems became standard in cameras, photographers would have been familiar with both.
Digital SLRs use reflective metering systems, whereby the camera sets the exposure according to the intensity of light reflected from a subject. The main benefit of this method of light measurement is convenience. The metering system can be built into a camera, and light measurements taken using the light that enters the camera’s lens.
The disadvantage is that some subjects are more reflective than others; often subjects that are dark in colour can cause general overexposure, while very light-coloured subjects can cause underexposure.
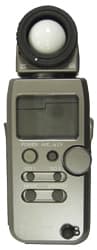
Incident light measurement can be more reliable, because the subject’s reflectivity is not taken into account. The disadvantage is that an incident light reading must be taken using a handheld lightmeter, and the suggested exposure transferred manually to a camera. The histogram function on a DSLR’s LCD screen can be used as a quick and easy guide to judge accurate exposure, arguably removing the need for incident light readings with a DSLR.
Understanding exposure
Spot metering

 Spot metering systems measure light from a very small area of the frame, often as small as just 1%. Technically, ‘true’ spot metering refers to a sample of 2% of the frame or less, but the term is sometimes used to describe any system where the measured area is less than 10% of the frame.
Spot metering is extremely useful when the subject occupies a small area in the scene and/or is significantly brighter or darker than the background.
Locking the exposure from the subject using spot metering will ensure that the difference in brightness does not unduly bias the final exposure.
Evaluative metering

 Evaluative metering, sometimes called pattern, multi-segment or matrix metering, works by dividing the scene up into many different segments and analysing the light readings from each to arrive at the best exposure.
The evaluative metering systems of most DSLRs are linked to the focusing points, so the camera will bias the metering towards the area around the focus point, assuming it to be the subject.
Evaluative metering is extremely capable and some systems even take into account the subject’s colour and distance, making them all but infallible in most situations.
Centreweighted/partial metering

 In-built TTL (through-the-lens) light metering for SLR cameras has been around since the 1960s, but for many years centreweighted metering was as sophisticated as it got.
With this system, the exposure is calculated on the basis of the intensity of light in the centre of the image area. It is very reliable in normal use, assuming that the subject occupies the central area of the frame.
Partial metering is similar, but the reading is taken from a smaller area, usually 9-20% of the frame.
Exposure bracketing and compensation
Reflective metering systems are designed to calculate the correct exposure based on the amount of light reflected by a subject. As different subjects have different reflective qualities, metering systems are calibrated for targets with an ‘average’ medium grey tone that reflect around 18% of the light that falls on them.
What this means in practice is that whatever the subject’s reflectivity, the metering system will assume it is looking at a roughly 18% reflective surface. In reality, most photographic subjects do not fall into this category, so it is important to be able to interpret your camera’s metering system for the best results and, where necessary, override it.
Exposure compensation
If you know that the subject will cause problems for your camera’s metering system, you can use exposure compensation. In the bracketed sequence shown below, the bright snow has caused the camera’s metering system to underexpose the shot, making the snow look grey.
When shooting snow, or any particularly reflective subject, setting +1EV exposure compensation will provide a more suitable exposure. Likewise, very dark subjects, such as a black dog on a dark-coloured sofa, may require negative exposure compensation in order to avoid overexposure.

Bracketing
Exposure bracketing is offered by most DSLRs. In a bracketed sequence, three images are taken in one go: the recommended exposure, with one lighter and one darker, as shown below. For most subjects, a bracketed range of ±1⁄2EV is adequate.
Advanced exposure techniques
Histogram
 A histogram is a graph showing the spread of tones in an image, with the peaks to the left showing the darkest areas and the peaks on the right showing the brightest areas.
In an average picture, with an equal number of dark and light areas, these peaks should be evenly distributed across the image.
If your image is underexposed the peaks will be bunched to the left end, and perhaps fall off the end of the graph, while with overexposure they will be over to the right.
Simply adjust your exposure to get the peaks nearer the centre. However, with some subjects the peaks need to be biased to one side. With a snow scene, for example, they should be over to the right. If they’re in the centre it means your snow is mid-grey in tone.
Many cameras offer a live histogram so you can view it before shooting, rather than having to go into review mode and see it afterwards.
Dynamic Range Adjustment
A perfect exposure is generally regarded as one that records detail in both the darkest and lightest parts of the scene (excluding high- and low-key images).
Sometimes, though, the subject contrast is beyond the sensor’s ability to record detail in both the deep shadows and bright highlights.
Many cameras now include a Dynamic Range feature that boosts detail in the shadows and/or holds back the highlights. This is very much like Photoshop’s Shadow/Highlight feature.
Use caution, though. Apply too much and the image will look unreal, and noise will be increased in the shadows.

The Dynamic Range feature boosts shadow and/or highlight detail

HDR is a technique that involves taking several shots at different exposures and blending them together on the PC
High Dynamic Range (HDR)
High Dynamic Range photography, or HDR, takes the Dynamic Range adjust feature a stage further.
It involves taking a range of shots at different exposure settings.
You can use the auto-bracket to achieve this.
Then using either Photoshop or dedicated HDR software to combine these shots into one image that incorporates a wider range of detail than you can get from a single shot.
However, the effect can look cartoonish and unreal if applied too heavily.
Some cameras now offer an HDR option in the camera.