Lee Frost
Lee Frost is one of the UK’s best-known landscape and travel photographers and an accomplished writer. After a stint working for the photographic press he went freelance, and now, more than 20 years later he is still going strong. Visit www.leefrost.co.uk
The saying ‘less is more’ can be applied to many things in photography. Equipment is one – you don’t need loads of it to take great photographs. Composition is another – the more you cram into an image, the less appealing it’s likely to be. The same goes for light. You may assume that lots of it is required to produce successful shots, but in reality, the less there is the better. Sunrise and sunset are universally regarded as the most photogenic times of day, yet light levels are significantly lower than those at midday. The urban landscape also looks far more photogenic in the evening. Low light isn’t just about the great outdoors – the same rules apply indoors as well.
When day turns to night
When it comes to light, quality is always more important than quantity. A little special light beats loads of mediocre light hands down. Outdoors, low-light shooting begins as the day ends, and it ends as the next day begins. As soon as the sun dips below the horizon, day starts its slow transformation into night. Direct light on the landscape disappears and the sky overhead turns into a huge softbox that floods the earth with diffuse illumination, while the sky above the western horizon burns like fire (with any luck). Slot a hard ND grad filter into your filter holder and you can capture the lot in a single exposure – a foreground full of detail and a sky full of colour.
Twilight sees the warmth in the sky dissolve seamlessly into colder purples and blues, while daylight levels fade and scenes visibly darken. The urban landscape comes to life at twilight, when daylight has faded enough for man-made illumination to cast its technicolor spell, but there’s still enough of it around to stop those shady spots from turning black. This crossover period between day and night is the prime time to shoot floodlit buildings, street scenes and cityscapes. To capture traffic trails, find an elevated viewpoint overlooking a busy road or roundabout, mount your camera on a tripod and use an exposure of 30-60secs to record moving traffic as colourful light trails. Autumn and winter are the best seasons to shoot traffic trails as twilight coincides with rush hour.
Painting with light is a great technique to try too. An easy option is to use a powerful torch or a flashgun to illuminate a feature in the foreground of a scene, such as a jetty on a lake, or a statue or monument against the twilight sky. On a bigger scale you could use multiple flash bursts to illuminate the exterior of a building by walking around and firing the flash at different areas. Funfairs offer lots of different low-light opportunities. If you don’t fancy lugging a tripod around, shoot high-ISO candids of people standing in pools of light – ISO 1,600-6,400 will be required. Alternatively, take your tripod and use exposures of 10-30secs to record movement in spinning rides such as a Ferris wheel or Waltzer. Combining a burst of flash with a slow shutter speed is a great way to capture folk having fun, as the flash will freeze them while the slow shutter speed adds blur to capture a sense of motion.
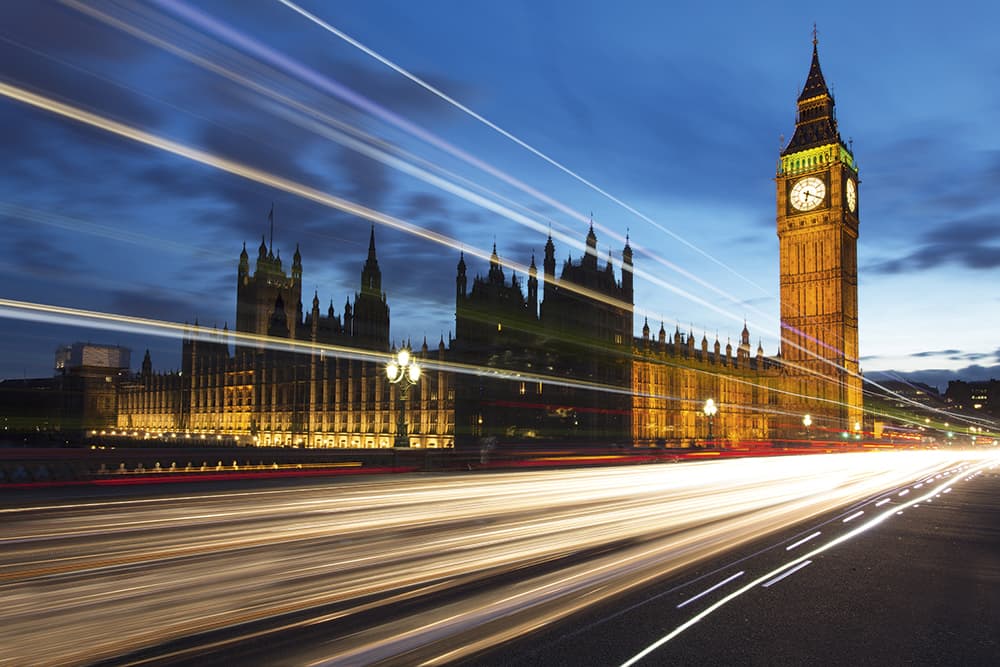
If using a long exposure when shooting urban scenes, passing traffic will record as colourful light trails. Canon EOS 5D Mark III, 14-40mm, 30secs at f/22, ISO 100. Image Lee Frost
Moonlight and the Milky Way
Once the sky looks black, you can turn your attention to the heavens. How about shooting landscapes in moonlight? Put water in the foreground so it picks up the shimmering silver ribbon of moonlight dancing on the inky-black surface. Or keep the camera’s shutter open for 10 minutes or longer and turn night into day. Get as far away from civilisation as you can on a clear night and you can use a long exposure to record stars in the sky as trails of light. Point your widest lens towards the northern sky so you include the Pole Star (Polaris) and lock your camera’s shutter open on bulb for 2 hours at f/4 on ISO 200. You’ll be amazed by the results. Alternatively, use an interval timer and shoot 200-300, 30sec exposures one after the other, then ‘stack’ them in Photoshop or use special software such as Image Stacker (www.tawbaware.com). For shots of the Milky Way you need your widest lens set to its widest aperture – ideally f/2.8 – and an ISO of 1,600-3,200. Shorter exposures are required to prevent the stars in the night sky from trailing owing to the earth’s rotation. Divide the focal length of your lens by 500 to calculate the longest exposure you should use. For example, for a 20mm lens on a full-frame DSLR, it’s 500/20=25secs.
The great indoors
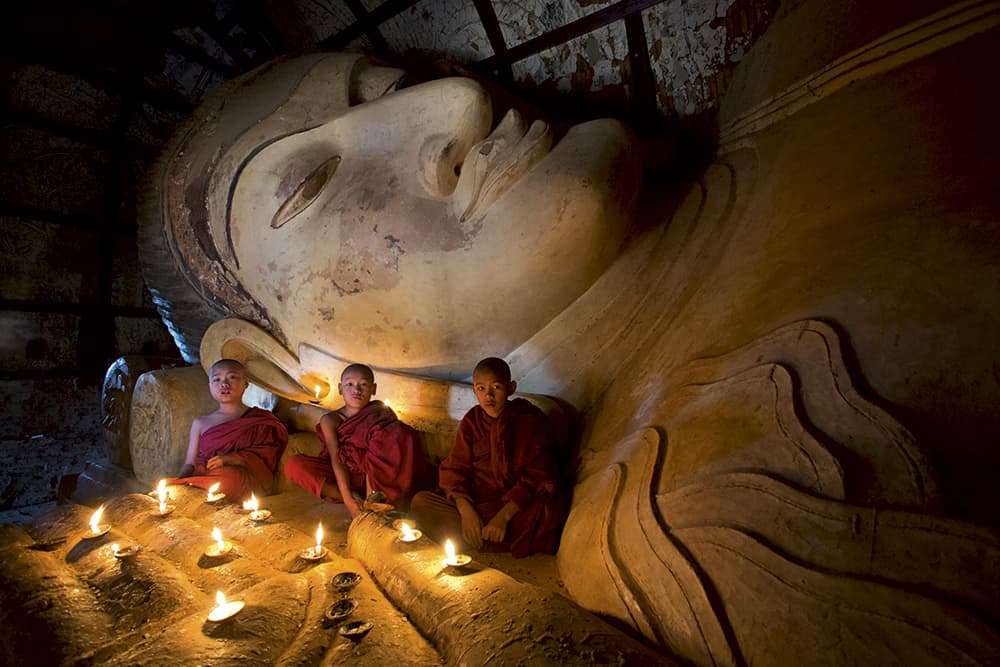
With candles the main source of illumination and subject movement a risk, a high ISO and relatively wide aperture are needed to keep the shutter speed down. Canon EOS 5D Mark III, 17-40mm, 1/10sec at f/5.6, ISO 2,500. Image Lee Frost
Low light is easier to achieve and control indoors, so you can create whatever mood you’re after. Interiors lit by available light make great low-light subjects, especially old buildings like churches and cathedrals that are dark and mysterious. Capture daylight streaming through windows and catching key features, or switch to your widest lens and shoot the whole interior. In your own home you can experiment with candlelight and firelight, both high scorers in the mood stakes and ideal for portraits, nude studies and still-life shots. Even the light from a single match is enough to illuminate someone’s face. When there’s so little light to work with, exposures can easily become long, but the latest DSLRs have fantastic high-ISO capability. So if you bump it up to 1,600, 3,200, or even 6,400, you’ll be able to take handheld shots with no trouble at all, and image quality will still be surprisingly high.
The light from tungsten bulbs and candles has a very low colour temperature – down to 2,000k. This means that it’s very warm, so your images will come out with a strong yellow/orange cast. You can correct this by changing the white balance on your camera to tungsten, but doing so may destroy the mood of the lighting. So maybe shoot on daylight or auto white balance, then calm down the colour cast a little during post- production if it’s too much.
For something more creative, try painting a still life with light from a small LED torch in a darkened room. A bunch or flowers, a bowl of fruit or any arrangement of interesting objects can be used, and you can build-up the light levels bit by bit, maybe placing coloured filters or gels over the torch for part of the exposure. Alternatively, trace the outline of your still life with a torch.
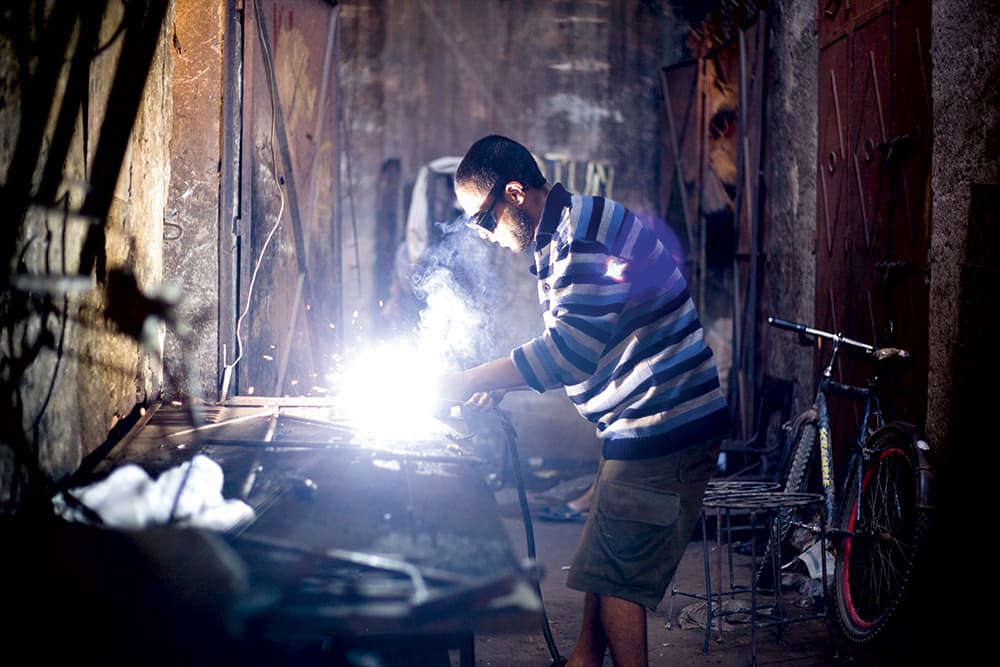
Welding makes a good low-light subject but the intense brightness of the light can cause exposure chaos, so experiment. Canon EOS -1Ds Mark III, 50mm, 1/200sec at f/2, ISO 1,600. Image Lee Frost
Factories, garages and other places of work where you find people with tools are great places to shoot low-light candids and portraits. Welders and grinders that kick out loads of sparks will add impact and interest. Or, if your subjects are constantly on the move, slip a flashgun onto your camera’s hotshoe and try your hand at slow-sync flash – where a slow shutter speed blurs your subject in the available light while the flash freezes them. It looks fantastic – especially if you set your camera to second (rear) curtain sync so that the flash fires at the end of the exposure. The available light in industrial or engineering locations can be amazing, with shafts of sunlight beaming down through small windows, cracks and holes, backlighting smoke and dust. This creates an atmospheric backdrop for environmental portraits and wideangle interior shots.
There are no hard-and-fast rules when it comes to shooting in low light. The subject range is vast, and experimentation is needed. Try new techniques like the ones discussed here. Push your camera to the limit of its capabilities. Take creative risks. You will make mistakes, but you’ll also create some amazing images and realise that when it comes to light, the less there is, the better.
Low-light metering
a 10-stop ND filter was used to extend the exposure for this dusk shot, which helped to record motion in the clouds and water. Canon EOS-1Ds Mark III, 24-70mm, 2mins at f/8, ISO 100, B&W ND 100 3.0 filter. Image Lee Frost
Modern DSLRs (and compacts for that matter) have amazing metering systems, so the days when low light caused major exposure headaches are long gone. For the best results, and an easy life, set your camera to its multi-pattern metering mode (Canon use ‘Evaluative’, Nikon use ‘Matrix’) and the exposure mode to aperture priority (AV).
Once exposure falls outside of your camera’s automated shutter-speed range, you’ll need to use the bulb (B) setting, which allows you to keep the shutter open as long as you like. This may be marked on your camera’s exposure mode dial or accessed in either shutter priority (TV) or manual (M) mode.
Whatever your subject, take a test shot. Then have a look at the preview image and histogram and adjust the exposure accordingly. The key is not to blow the highlights. This may be unavoidable with bright points of light such as street lamps in a night scene, but providing they are small, you don’t have to worry.
___________________________________________________
Colin Roberts
Colin was an amateur photographer working with film for more than 20 years, but in 2005 he turned professional and switched to digital. He travels across the UK in search of inspiring coast and countryside. Visit www.colinrobertsphotography.com.
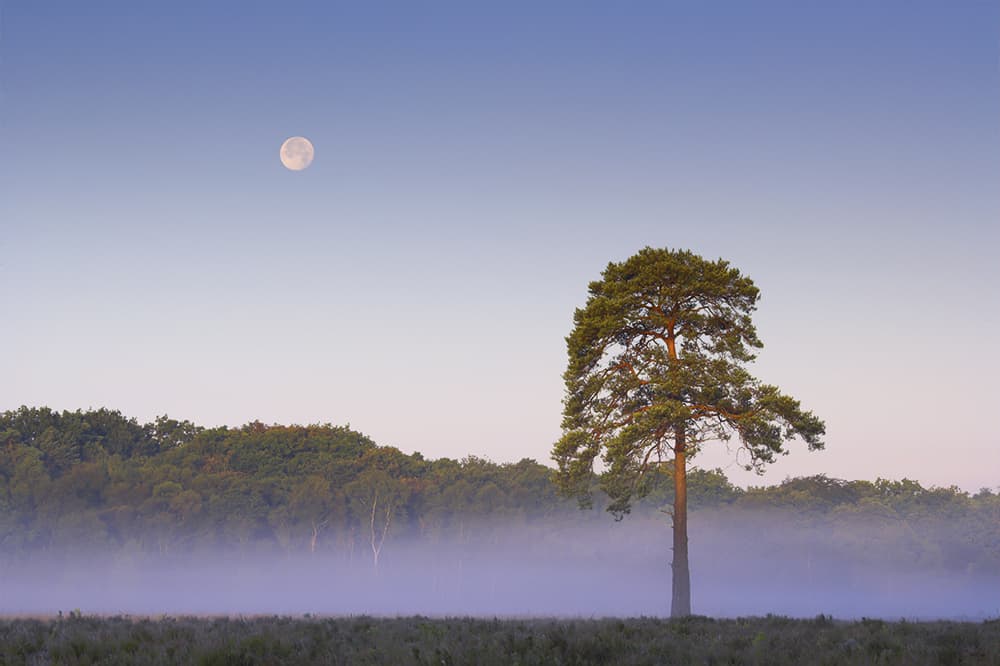
Moonset with pine. Canon EOS-1Ds Mark II, 135mm, 1/10sec at f/16, ISO 100, polariser, Lee 06. ND grad. Image Colin Roberts
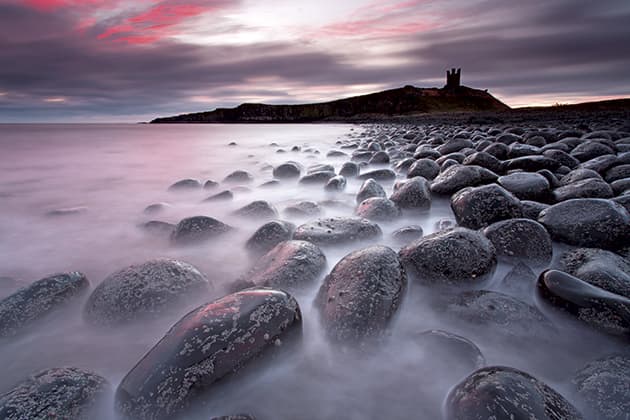
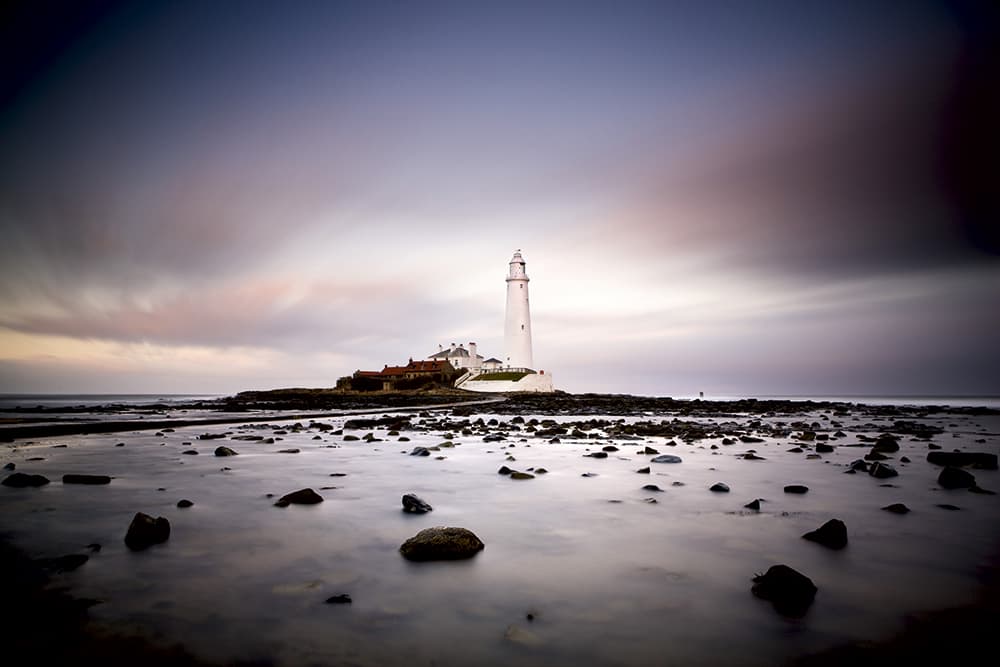
Some of the best low-light locations are those where the subject stands in profile on the horizon: monuments on hilltops, lines of trees along ridges, windmills in flat landscapes, and so on. When shot at dawn or dusk these features appear as strong silhouettes against a colourful skyline. Areas of water can also play a big part in low-light situations and so do mist-prone locations.
Shooting low-light landscapes requires a tripod and preferably a static subject. The main technical issue is noise, most noticeable in shadows and areas of plain colour. My approach to minimising noise is simple: I stick to a low ISO (usually 100) and select the widest aperture I can get away with to avoid unnecessarily long exposures.
Exposing for a low-light landscape is simple for me – I use ND grads to balance the sky, take a few test shots, check the LCD screen, and select the one I like best! My camera is a Canon EOS 6D and the lenses I use are a Canon EF 50mm f/1.8 STM, a Zeiss Distagon T* 28mm f/2 (which requires an adapter to fit my 6D), and a Canon EF 135mm f/2L USM. I use Hoya circular polarisers for reducing glare and unwanted reflections, and a range of LEE ND grads for balancing light levels.
For metering, I leave the camera on centre-weighted average, and set my exposures manually, using the results on the LCD screen as a guide. I bracket my shots up to two stops on either side of the suggested exposure, just to be sure. I work in raw, so there is always a bit of post-processing to do. I usually shoot with the white balance set to daylight, then tweak the results in Camera Raw. Finally, I might apply selective noise reduction.
Colin’s top tips
- Beautiful colours and luminous light around dawn/ dusk don’t last long, so plan your shots in advance.
- Exploit 50mm prime (or ‘standard’) lenses: They are small and lightweight, and offer high optical quality at good prices. They have wide maximum apertures (f/1.8 or wider), making them ideal for low-light shots.
- Don’t restrict yourself to fine weather and clear skies. Try shooting in overcast conditions for a moody feel, or between rain showers when surfaces are wet and reflective.
___________________________________________________
Andrew Mason
Andrew has been a portrait photographer since 2006. He specialises in shots of business people, musicians and private individuals. Andrew also runs 36exp Photography Courses, and travels widely for his work. Visit www.andrew-mason.com.
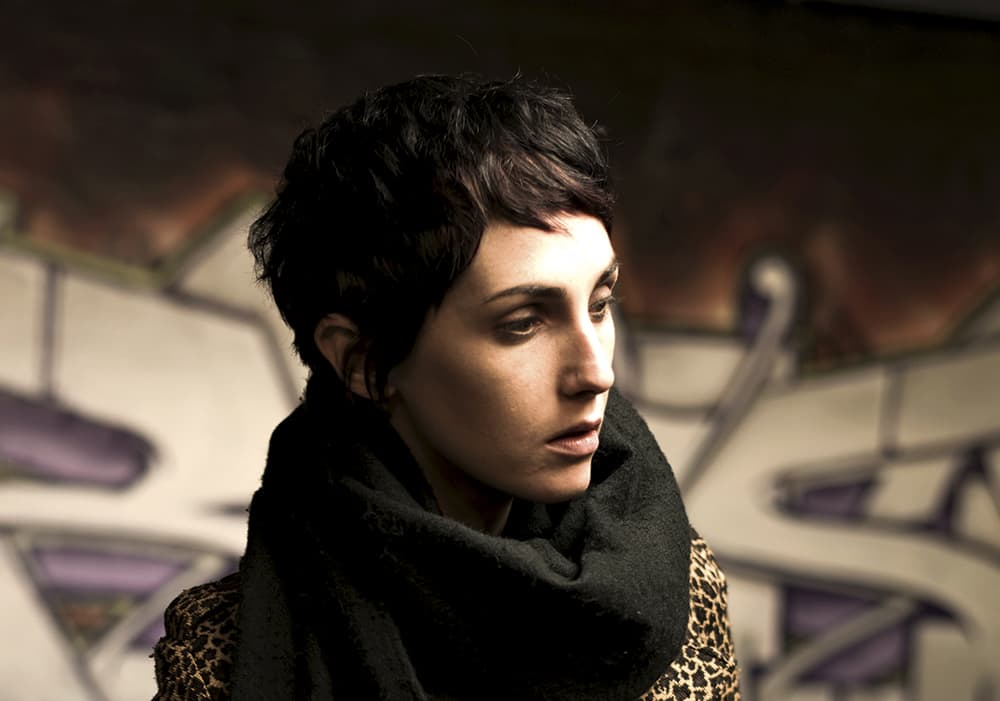
A low ISO ensures there is no noise. Nikon D600, 85mm lens, 1/60sec at f/2.8, ISO 250, one off-camera flash. Image Andrew Mason
The main problems I encounter when shooting portraits in low light are noise and camera shake. Noise can often be dealt with using in-camera features, and post- processing techniques, but it’s best to avoid it in the first place by using a low ISO, where possible. Camera shake can be overcome by using a wall, fence or other support to lean against or place the camera on.
Slow shutter speeds and moving subjects increase the risk of blur. So I try to use lenses with wide maximum apertures to allow as much light in as possible, and prevent shutter speeds from becoming too long. Sometimes I use a burst of flash to freeze motion. I shoot in raw and carry out most of my post-processing in Lightroom, which has excellent noise-reduction features.
When it comes to exposing for a low-light portrait I often look for a small amount of light from a lamp or window falling onto the subject’s face, and take a meter reading from that area. Don’t be afraid to underexpose the image slightly to create a moody portrait. I use manual mode to carefully control the exposure. My advice would be to let the shadows go to black and expose for the highlights (or bright areas on your subject’s face).
I use a Nikon D600 with a 85mm f/1.8G lens, Yongnuo flash, Phottix remote triggers, and sometimes a reflector. I set the camera to manual mode, use a large aperture to provide shallow depth of field (and let in plenty of light), and keep my shutter speed around 1/100sec to avoid camera shake. I then adjust the ISO to obtain the right exposure. I also use noise reduction, spot healing and add some punch with the clarity slider.
Andrew’s top tips
- Use a prime lens because it will let in plenty of light and provide shallow depth of field.
- Don’t be afraid to boost the ISO: It’s better to have a noisy image than a blurry one. Don’t be too scared of using high ISOs to keep your shutter speed high.
- Use off-camera flash: Learn about off-camera flash. Just one, directed well, can look really good.
Long exposure and noise
When you use long exposures in low light, the sensor gets warm and you get ‘hot pixels’, which appear on images as tiny bright dots. They are caused by charge leakage from individual pixels in the camera’s CCD and show up on long exposures because the pixels in question literally light up.
Modern DSLRs have a long exposure noise-reduction feature. This removes hot pixels by making a second identical exposure to the first one with the shutter closed; so the camera knows exactly where the hot pixels are and subtracts the dark frame image from the one you just made. However, the second ‘blank’ exposure has to be the same duration as the first, so if you make a 10-minute exposure, you’ll have to wait another 10 minutes before the image pops up on the preview screen.
If you are impatient for this, keep Long Exposure Noise Reduction turned off and use noise- reduction software during post-production. Try Noise Ninja, Topaz DeNoise or Dfine2, which is part of the superb Nik Collection from Google. You can also use Photoshop or Lightroom.
___________________________________________________
Ben Hall: Noise reduction using Lightroom
1. Find excessive noise
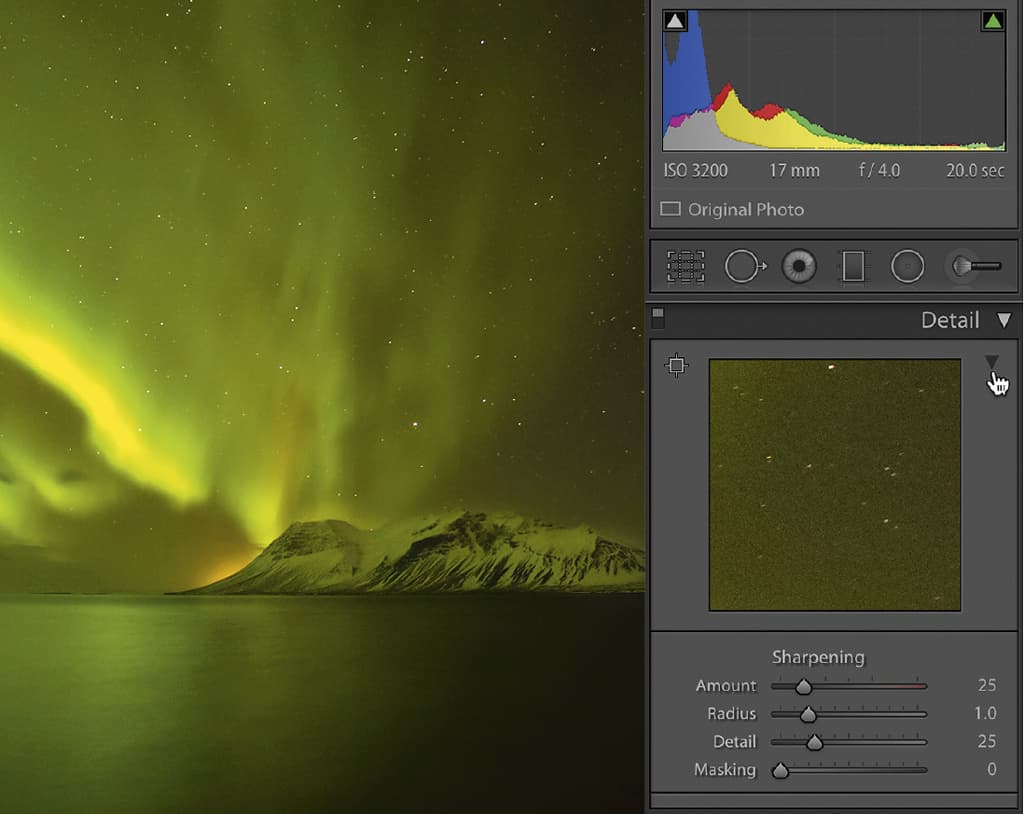
Noise reduction should be the last step on the processing ladder. Once you have completed all other adjustments, open the detail panel. Click the arrow in the top right corner. This opens a small window showing a section of the image at 100%. This can be moved, so select part of the image that shows an excessive amount of noise and where shadow areas are most affected.
2. Note the type of noise

With the Detail panel now open, you’ll see sliders for colour and luminance noise. Colour noise appears as multi-coloured pixels and is regarded most unsightly. Luminance noise is monochromatic and more uniform in nature – similar to film grain. Click on your main image once to zoom in 100%, and scan around the frame, noting the most evident type of noise.
3. Adjust the colour
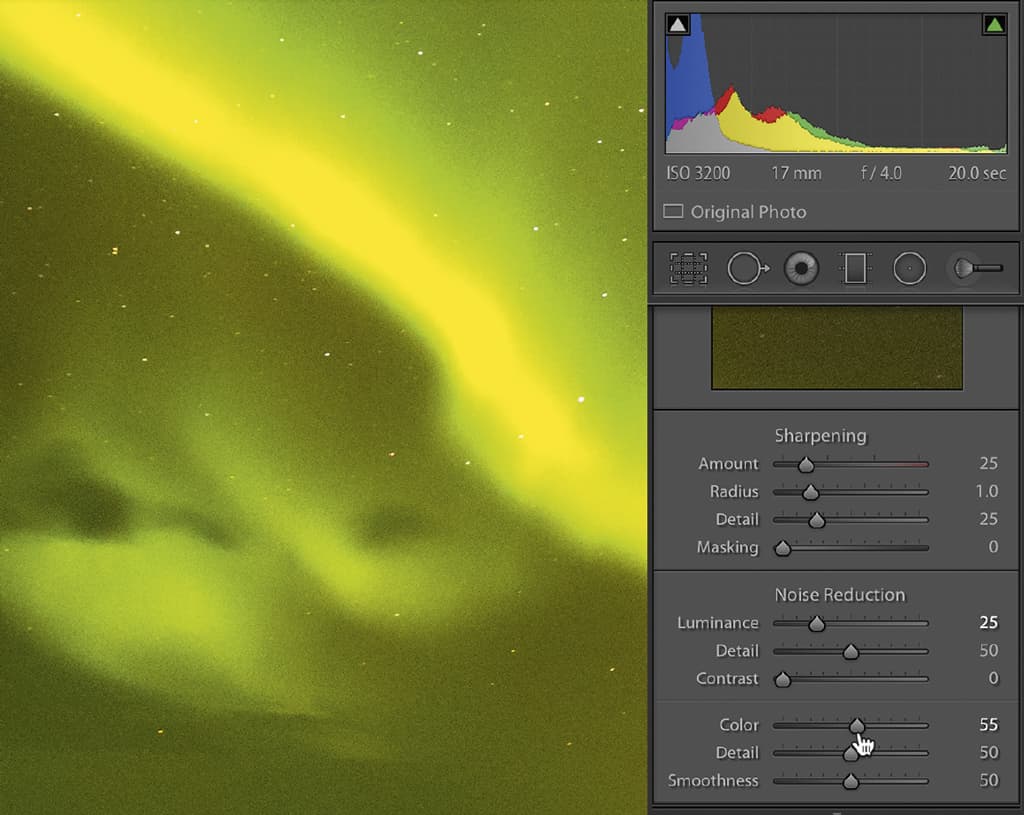
I usually start with the colour slider. Lightroom has its amount default set at 25, so use this as a base. Now move the slider to the right to increase the amount of noise reduction. As each image will be different, you’ll need to use your own judgment as to how much to apply. Avoid excessive amounts of noise reduction as this can result in a loss of fine detail.
4. Adjust the luminance
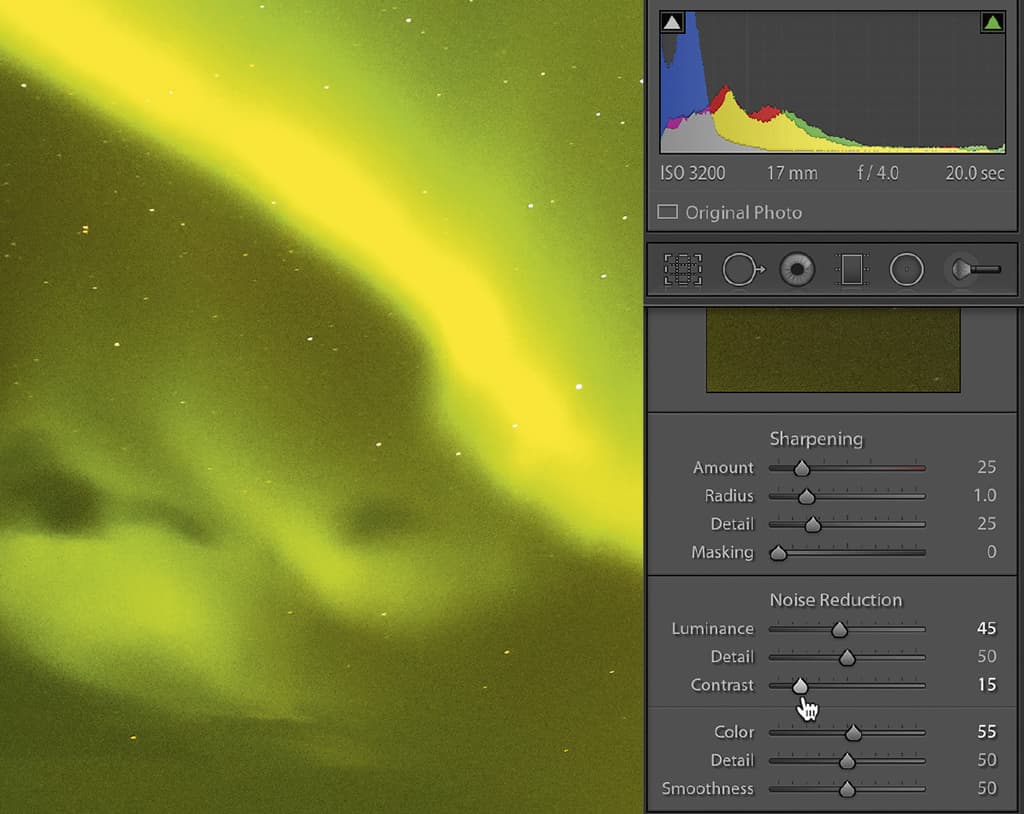
After you have removed the colour noise, the luminance slider can be used to reduce the remaining luminance noise. Increase the amount slowly and pay close attention to the magnified image. Stop before you notice a loss of detail.
5. Adjust sliders sparingly
There are also sliders for detail, contrast and smoothness. The luminance detail slider controls the luminance noise threshold. Adding too much can actually introduce noise, so use it sparingly. The contrast slider controls luminance contrast, and again high values can create noise and mottling, so only add it in very small increments.
6. Detail and smoothness
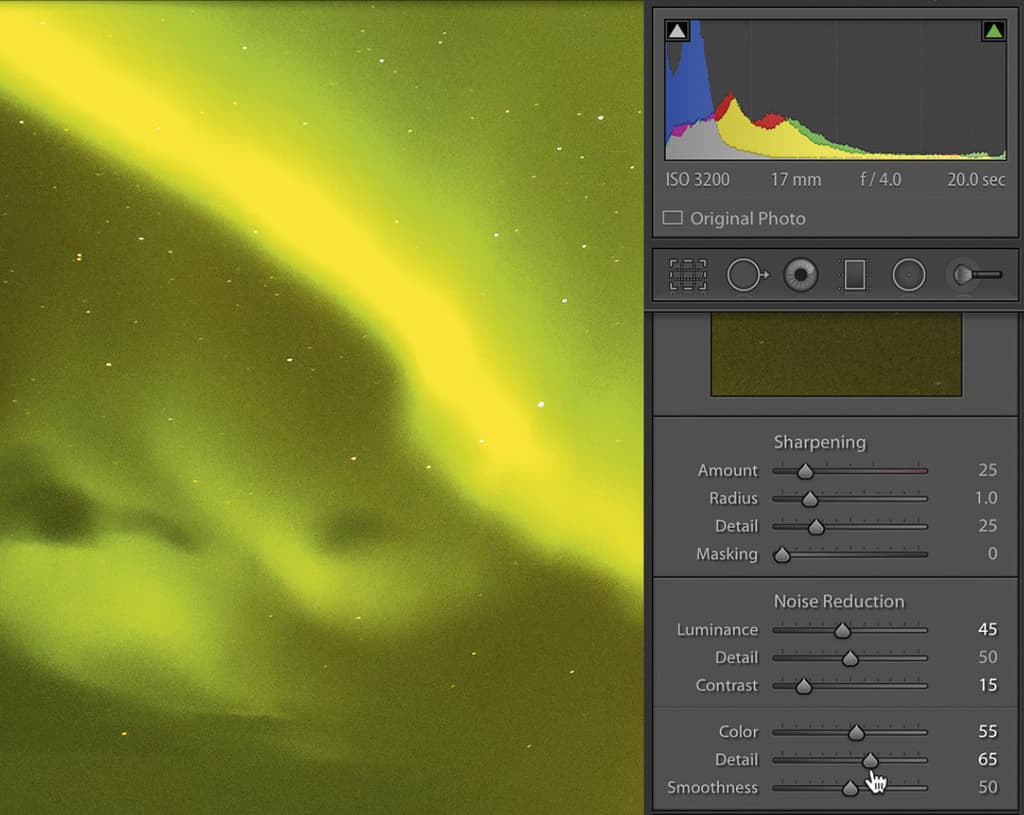
For colour noise there are two more sliders: detail and smoothness. The detail slider controls the colour-noise threshold. Increasing it protects detail in thin edges, while decreasing it smooths the colour noise further, but can cause loss of detail. In the final stage, the smoothness slider can be used to reduce mottling artefacts, but at the expense of fine detail.
___________________________________________________
Kit list
DSLR with high ISO performance
Any DSLR/CSC can be used, but models offering high ISO performance are better as image quality will be higher when you shoot at ISO 3,200 or above. The Nikon D5 has a maximum ISO of 3,280,000.
Light, fast lenses
Primes/zooms with a ‘fast’ maximum aperture are ideal. They give a brighter viewfinder image and keep the shutter speed up and ISO down. The 50mm standard lens is perfect: it’s light, fast and super sharp.
Remote release
For long exposures, it’s better to trip the camera’s shutter with a remote release, as using your finger can move the camera. Some remote releases also have interval timers for shooting a sequence of images.
Solid, sturdy tripod
Although you can shoot amazing low-light pictures handheld, most times you’ll need to mount your camera on a tripod to keep the ISO low for optimum image quality, and use long exposures.
Neutral density filter
ND grad filters help balance the sky and foreground for coastal views and landscapes. At sunrise and sunset you’ll often need a 0.9 density (3-stop) grad, while a 0.6 (2-stop) grad is for general use.
LED torch
Torches are handy for painting with light both indoors and out. They also help you to see what you’re doing when it’s dark. Modern LED torches are amazingly powerful, yet small and lightweight.


