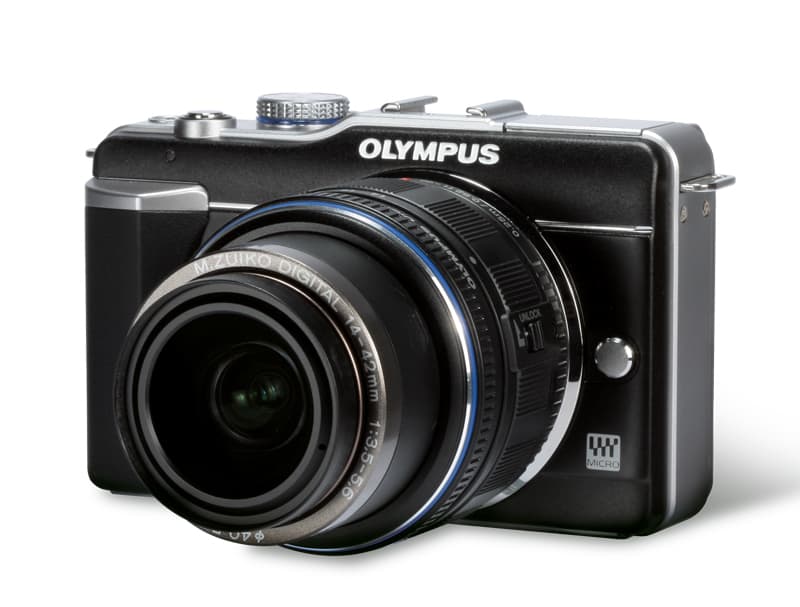
Olympus Pen E-PL1 at a glance:
- 12.3-million-pixel Live MOS sensor
- Micro Four Thirds system
- In-camera stabilisation
- New Live Guide feature
- Street price around £550 with 14-42mm kit lens
One of the many advantages of cameras now having LCD screens is that it allows a new level of interactivity between the camera and the photographer. As well as allowing photographers to preview the effects of altering the image settings, some manufacturers are now taking this a stage further by using the screen to explain the effects of adjusting the exposure settings.
In its Micro Four Thirds Pen E-PL1 camera, Olympus has introduced a new Live Guide. The feature is designed to make it easy for those not familiar with photographic principles to change the camera settings without having to worry about technical terminology.
Similar in specification to the Olympus E-P1 and E-P2 Micro Four Thirds models, the E-PL1 has a full complement of manual-exposure options that will allow entry-level photographers to develop as their knowledge advances.
When these features are combined with a built-in pop-up flash (a notable omission from the two previous Pen models), the E-PL1 may be ideal not just for those wanting to invest in the Micro
Four Thirds system, but also more generally for photographers moving up from compact cameras.
Features
 Like the Olympus E-P1 and E-P2, the E-PL1 has a 2.3-million-pixel Live MOS Four Thirds imaging sensor. The major technical difference between the E-PL1 and the two previous Pen cameras is that the newer model is fitted with a weaker low-pass filter. By reducing the strength of this filter and improving the image processing, image sharpness should be improved over the previous filter and sensor combination.
Unlike Panasonic Micro Four Thirds cameras, which rely on optically stabilised lenses, Olympus Pen cameras, including the E-PL1, have in-camera, image sensor-shift stabilisation. This helps to reduce camera shake, regardless of what lens is used.
The stabilised sensor is capable of capturing both JPEG and Olympus Raw Files (ORFs) at a maximum resolution of 4032×3042 pixels. Images at this resolution have an aspect ratio of 4:3, the same as that used in most compact cameras.
Those more used to shooting with a 3:2 aspect ratio can change to this format in-camera, with square and 16:9 (widescreen) aspect ratios also available. However, these non-native aspect ratios do reduce the size of the image. Like the E-P2, the E-PL1 has the new accessory socket below its hotshoe. The primary reason for this is to allow the optional Olympus VF-2 electronic viewfinder accessory to be attached to the camera, but more on this later.
The accessory shoe does have another function, though. It can be used to attach the Olympus SEMA-1 external microphone adapter kit. This allows the included Olympus ME-51S stereo microphone to be attached to the camera to capture stereo sound when recording video footage.
One feature of the E-PL1 that is lacking in the more expensive E-P2 is the built-in pop-up flash. However, with a guide number of just 7m @ ISO 100, the flash is only really suitable for adding a touch of fill-in flash or brightening a night-time portrait.
Build and handling
 Like the previous two digital Pen models, the E-PL1 has a simple but sleek retro design that harks back to the rangefinder cameras of the 1960s. The body itself is made of polycarbonate with a metal lens mount, and feels extremely solid and well built.
In terms of size, it is about the same as the Canon PowerShot G11, and the 14-42mm f/3.5-5.6 L ED lens is about half the size of an equivalent APS-C-format kit lens.
Most of the buttons on the Olympus E-PL1 are the standard selection that you find on nearly all DSLRs. However, a few slight differences include a dedicated Record button situated on the rear of the camera to allow quick access of video capture.
One control I sorely missed, though, is a control dial. Instead, changing the size of the aperture or shutter speed on the E-PL1 is achieved by pressing the exposure-compensation button and then using the up and down control buttons. This is very cumbersome. I wonder whether the saving in cost at the expense of ease of use was really worthwhile.
The camera’s on-board flash is located on the top left of the camera, popping up when its sliding switch is released. The small flash is mounted on a double hinge that helps lift it up away from the camera body and further from the lens, thereby reducing redeye.
The in-camera menu system will offer no problems to anyone who has used an Olympus camera before, and it is straightforward and easy to navigate. That said, it isn’t easy on the eye and looks a little dated compared to the sleek and stylish graphic interfaces appearing alongside the introduction of better LCD screens.
When in the automatic iAuto exposure mode, the new Live Guide is activated by pressing the OK button. This displays six icons on the right-hand side of the screen, which are labelled Change Colour Saturation, Change Colour Image, Change Brightness, Blur Background, Express Motions and Shooting Tips.
The colour saturation option is fairly self-explanatory, but a few of the others are oddly named. For example, the Change Colour Image adjusts the white balance, allowing you to warm up or cool down the image. Change Brightness is an EV adjustment setting, while Blur Background actually relates to aperture adjustment. The most confusingly named is Express Motions, which is actually the shutter speed control. Finally, Shooting Tips is a simple guide that offers advice on how best to take a variety of pictures.
Each of the different adjustments is controlled by using the rear buttons to adjust a vertical slider on the right-hand side of the screen. By default, the adjustment level is set to the middle of the slider, and moving the level up or down alters the strength of the effect. So, by moving the Blur Background option to its maximum, the widest available aperture is selected.
Despite the confusing names, the Live Guide is simple to use. However, only one of the Live Guide settings can be changed at any one time. While this makes it easier for the camera to automatically produce a correct exposure, it is very restrictive. It would have been better to allow multiple adjustments, such adjusting the saturation and blurring background, and to then display a warning if the selected settings will create a problematic exposure.
White balance and colour
Those simply wanting to point and shoot will find that the iAuto Change Colour option allows them to quickly and easily warm or cool the white balance to their preference. In all other exposure modes, an automatic white balance setting is available that produces natural-looking images with a good neutral white balance. A selection of preset, custom and manual options is also available for those wanting more control.
Like cameras in the current Olympus range, the E-PL1 features a selection of Art Filters. There are six of these effects available, and each adjusts the exposure settings and applies a different filter effect to an image. Of these effects I found that the Pop Art, Grainy Film and Diorama were the most interesting. The Diorama, in particular, stands out. It applies a blur to the top and bottom of the image so that it looks as though you are photographing a subject from above using a tilt-and-shift lens.

Image: The E-PL1’s Diorama mode gives images the effect of having been taken using a tilt-and-shift lens
Metering
For photographers just starting out, evaluative metering will be the most regularly used metering setting. Thankfully, when in this mode the E-PL1 does an excellent job in most lighting situations. When faced with a dark foreground and bright but overcast sky, the evaluative metering mode seems to carefully expose images so that the foreground shows detail but without burning out the sky. On occasions this means that the foreground is still a little underexposed, but it is easy enough to correct the exposure in-camera or to adjust the image curve using editing software.
Spot and centreweighted metering modes will help to obtain more accurate exposures as the beginner’s level of ability advances, but two other spot metering modes are also available. Like the other Olympus Pen and DSLR cameras, the E-PL1 has shadow and highlight spot metering to help ensure that light and dark areas are correctly exposed.
These extra metering settings make the E-PL1 a great option for learning about how to use spot metering to obtain the correct exposure. Combined with the exposure compensation button and the in-camera histogram, it is easy to obtain well-exposed images with this camera.

Image: In most situations the E-PL1 produces well-exposed images with a good level of detail
Autofocus
Like all Micro Four Thirds cameras, the E-PL1 relies on a contrast-detection AF system. In fact, the AF system in the E-PL1 is the same as that used in the E-P1 and E-P2. In general use there are 11 AF points available, and any of these can be manually selected for use. With face detection turned on, the number of focus points increases to 25, but these cannot be manually selected.
However, more accurate focusing is possible by switching to the magnified view on the rear screen. This allows one of 225 available AF points to be manually selected, which allows the lens to be focused precisely when taking images of static objects, such as landscapes or still-life photographs.
For most situations I found that the AF performed well, finding focus quickly but struggling a little in low-contrast lighting. While it obviously isn’t as fast as a phase-detection system, only those who regularly want to photograph moving subjects will find the system inhibitive.
Resolution, noise and sensitivity

These images show 72ppi sections of images of a resolution chart, captured using matching 105mm macro lenses.
We show the section of the resolution chart where the camera starts to fail to reproduce the lines separately.
The higher the number visible in these images, the better the camera’s detail resolution is at the specified sensitivity setting.
Although the E-PL1 uses the same sensor as the E-P1 and E-P2, it employs a weaker anti-aliasing filter. Our resolution chart test shows that the weaker filter and the accompanying improved signal processing has a positive effect.
The 12.3-million-pixel sensor of the E-PL1 managed to reach around 25 on our test chart, which is slightly better than most 12-million-pixel DSLRs.
By default, as the ISO sensitivity increases the noise reduction starts to kick in. While this does reduce the amount of luminance noise that is visible in images, it also produces a slight blur that reduces the amount of detail.
 At ISO 3200 with the JPEG noise reduction turned on, the E-PL1 can resolve to about 20 on our test chart, but with the noise reduction turned off it can still resolve up to 24, albeit with some reduction in image quality due to noise.
It is a similar story with the E-PL1’s raw files. Colour noise can quite easily be reduced, but luminance noise is more difficult if you wish to retain the high level of detail in your images.
I decided to leave raw images looking slightly ‘grainy’ by keeping luminance noise to a minimum, but reducing colour noise as much as possible.
Dynamic range
Measuring around 11EV, the E-PL1 has a dynamic range of about 1EV less than most DSLRs we have seen released in recent months.
While I don’t find its dynamic range restrictive, the darker tones and shadow areas are a little darker than they could be. When this is combined with the fact that the metering seemingly favours highlight detail, it means that I had to brighten many images slightly using post-capture editing software.
 This graph shows the brightness values recorded by the test camera when it is used to photograph a stepped graduation wedge.
The wedge has transmission values in 1⁄2EV steps ranging from 0 to 12EV. The camera’s exposure is set so the 12EV section in the wedge has a brightness value of 255.
Software analysis of the image then determines the recorded brightness values of all the other steps and calculates the camera’s dynamic range.
Viewfinder, live view, LCD and video
As previously mentioned, the E-PL1 has no in-built viewfinder and instead relies on an electronic viewfinder that slides onto the camera’s accessory shoe. The Olympus VF-2 electronic viewfinder has a 1.44-million-dot resolution, with a 100% field of view and a refresh rate of 60fps.
Although it is always apparent that the VF-2 is an electronic rather than optical viewfinder, its high specification makes it feel comfortable and natural to use. Yet with the VF-2 costing nearly £250, most entry-level photographers will probably opt instead to use the EPL-1’s rear LCD screen.
Measuring 2.7in, the screen is slightly smaller than the 3in models currently found on most DSLRs, but it does help keep the size of the camera down. With only 230,000 dots, the screen is also of a fairly low resolution, so while it is suitable for composing images it is not quite so good for checking detail resolution in-camera.
Like the E-P2, video footage can be captured at a resolution of 1280×720 pixels at a rate of 30fps. Sound can be recorded in stereo, although the E-PL1’s built-in microphone is only mono. If you wish to record stereo sound you will need the Olympus SEMA-1 external microphone adapter kit, which costs around £90.
Verdict
With the competition for mirrorless interchangeable-lens cameras hotting up, it is important for a manufacturer to have a full complement of cameras in its range. The Olympus Pen E-PL1 is designed squarely for the entry-level market, and as such it should be simple to operate but with enough features to allow a beginner’s photographic skills to develop.
While the E-PL1 has excellent image quality and a full complement of manual settings and different metering features, there are a few areas in which the handling and operation could be improved to make it easier for entry-level photographers. The first of these is the rather confusingly named features of the Live Guide, such as Express Motions, which appear to be literal translations from Japanese. Similarly, a control dial would have speeded up the time taken to change the exposure settings.
Photographers looking for an affordable Micro Four Thirds camera should be impressed with the E-PL1, but there are still a few finishing touches that need to be made to make it perfect for those starting out in photography.