Photo Insight with Andrew Sanderson
 A renowned photographer, tutor, author and Ilford Master Printer, Andrew Sanderson offers practical tips on working with film and traditional darkroom techniques
I took the black & white image (below) while I was working on my book Home Photography: Inspiration on your Doorstep. At that time, I was doing a lot of simple observations around the house. I had set up my MPP 5x4in camera and was photographing the circular breadboard you can see in this set-up.
I did some shots with various kitchen utensils placed on it, trying cheese graters, sieves and other objects, to see what would work best. I was originally drawn to the carved word ‘Bread’ around the edge, which was worn and full of character. I shot the board with the letters in the foreground, but the rest of the board was an empty space. To add more interest to the composition, I introduced a pear from a fruit bowl and got in close, positioning the fruit just above the letters on the breadboard. I shot a colour Polaroid and really liked the result.
I then did a shot of the pear on its own, standing upright, lighting it from above with an Anglepoise lamp. Most people have these angled desk lamps at home, which goes to show that you don’t need fancy lighting set-ups to achieve professional results.
I placed the pear near the top of the frame and used the breadboard as an area of light tone to set it off. I like the effect that this causes: the partly seen circular area looks like the pear is standing in a circle of light, as if it is on stage.
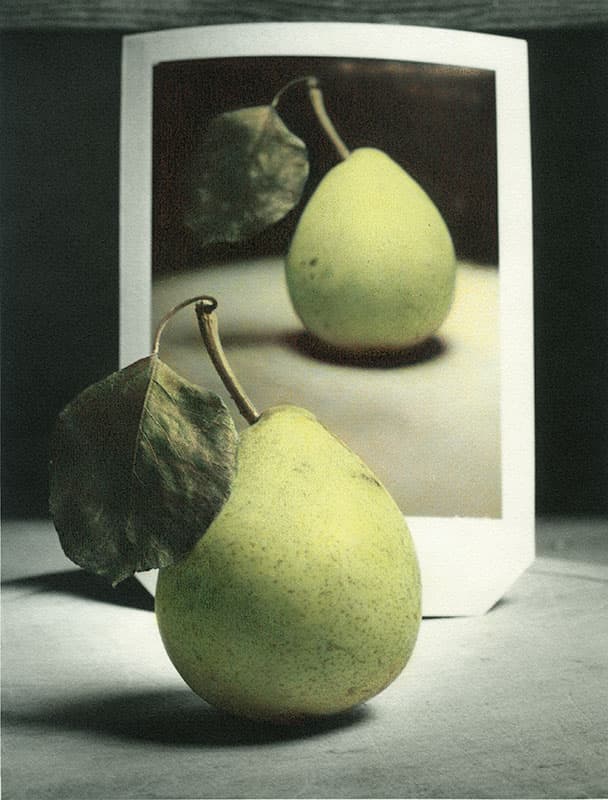
I took another Polaroid to see the result. I stood the Polaroid up to look at it, resting it against a low shelf behind the work surface, then I looked at the pear and the photograph together to see how well the Polaroid had represented it. Immediately I got the idea to shoot them together. In the final shot it looks as though the pear is either looking at itself in a mirror, or it is admiring a picture of itself. The title is ‘Pear and Polaroid’, but the subtitle is ‘A nice Pear’.
In the second of the two images (top), I have hand-coloured the pear image to draw attention to parts of it and to enhance the image further. Hand-colouring is a process almost as old as photography itself and involves adding colour back into a black & white print.
In AP 2 March, I wrote about my favourite techniques for hand-colouring black & white prints. There are lots of ways to approach this process, which I have covered in my book Hand Colouring and Alternative Darkroom Processes.

In the meantime, if you want to give hand-colouring a try, start by deciding how you are going to colour your black & white print. You can use dyes, photo oils, felt pens, food colouring or pencils, as I did here, for the least messy option. Although there are advantages and disadvantages to each method, pencils are great for beginners. Be warned, though, that they will only work with matt or semi-matt papers, and as the pencil lies on the surface of the paper they can obscure some detail in the image.
Before you start, use a paper towel to place on the print where your hand will lie while you’re colouring. This will make sure that your hand does not leave a mark on the image as you work. It is also best to test the coloured pencils on scrap paper before applying them to the image in order to see the hue. Finally, remember to start lightly, building up the colour. You can always add more colour later, but you can’t take it away!
These days, not everyone uses hand colouring to achieve colour-accurate results, but if that is the effect you are after, make sure you work in daylight. Try to use a mixture of tones where one colour is concentrated, such as in this pear. Be aware that highlights will require less colour and shadows more for a 3D final effect.
For those who want a more detailed explanation, you can find my Hand Colouring a Black and White Print’ video on YouTube to help you create your very own ‘pear’ of photos, like this! AP
Andrew Sanderson was talking to Debbi Allen

If you would like to read more about paper negatives, Andrew’s book Paper Negative Photography is available from www.blurb.com, price £15