Photo Insight with Andrew Sanderson
 A renowned photographer, tutor, author and Ilford Master Printer, Andrew Sanderson offers practical tips on working with film and traditional darkroom techniques
I am always on the lookout for interesting subjects for my still-life photographs. As I work exclusively in monochrome, this is particularly important because black & white can bring out the graphic shapes and tones of a subject. I’ve been reading a lot about the American photographer Edward Weston recently. He talked a lot about natural shapes and forms, such as shells, mushrooms and peppers, and it’s been a common theme to address these subjects throughout photography’s history.
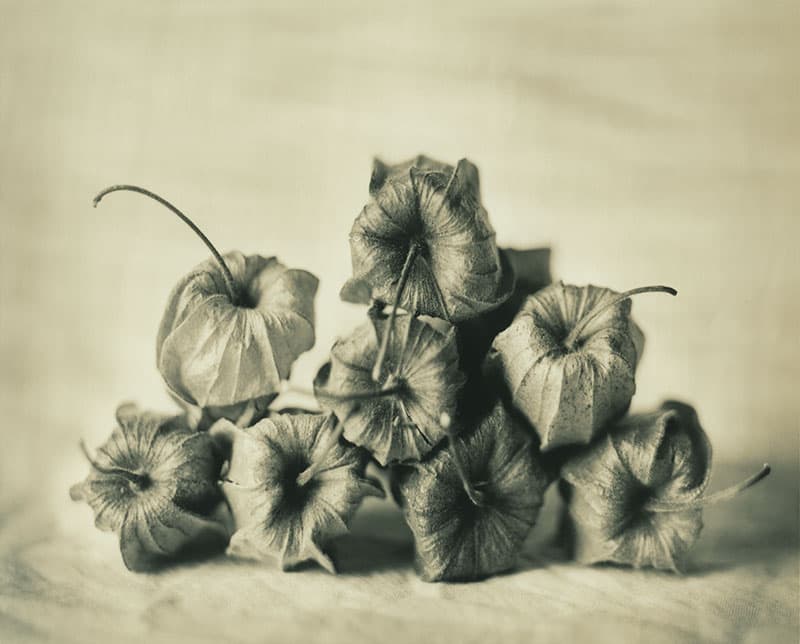
I had wanted to shoot these seedpods from a Chinese lantern (Physalis alkekengi) for ages, and I finally got around to it one afternoon when I had some spare time. The first thing I had to decide was whether to shoot just one seedpod or shoot a bunch of them in a group formation. I realised that including just one seedpod in the frame wouldn’t be enough as it wouldn’t do the form justice. Shooting one would have felt like I was producing an image for a reference book about plant species, while having a large group allowed me to explore other ways of showing the plant. Here I was able to arrange the seedpods in a triangular formation and shoot them from the stalk end. I was being truthful to the object, but also making an artistically arranged still-life composition.
Despite the subject being incredibly small, I decided to use a wooden 5x4in medium-format field camera made by Nagaoka with a Schneider Xenar 135mm f/4.7 lens. Sadly, this is a camera that I no longer own. The Nagaoka is a very thin, light compact camera that folds away into almost nothing. However, I should say that it’s not the sturdiest of cameras. Even when it is set up and all the movements are locked, it still feels rather flimsy. Shortly after taking this photograph I ended up selling this camera and going back to using a Micro Precision Products twin-lens reflex. It weighs about four times more than the Nagaoka, but it’s a lot sturdier in a strong wind.
One of the things that appeals to me about large-format photography is the drop-off of focus in the background. The larger the format, the more this occurs. If you want to take a close-up shot using a 5x4in camera, you need to extend the lens quite a distance from the film plane. This will then decrease your depth of field. In the case of this image, it brought the subject out of the featureless background by having the nearest edges of the lanterns in focus. There’s something about taking a photograph in this way that makes it more expressive and less factual. By being selective with the focus, it makes the viewer look at a particular part of the image rather than letting their eye roam around and take in too much information.

The lighting for this photograph was incredibly simple – light from one large window in the kitchen illuminating the seedpods on the table. No reflector was used. When I’m lighting a subject, I always prefer to use natural light. If that’s not available, I’ll choose a source of illumination where I can actually see the light fall on the subject in front of me (as opposed to flash, which is a short burst). This includes things like a tungsten bulb, a torch or a candle. I can then see how spread out the light is in front of me, how soft it is and where the shadows fall. You can’t see that with flash, unless you’re using studio flash where you have modelling lights. However, if you’re using handheld flash you don’t have that luxury. I prefer to be able to see what’s happening and control the light in some way.
I used X-ray film for this image as I had an abundance of it at the time. In those days, working with X-ray film was a fairly new process for me. I experimented a lot with different genres, such as landscapes, portraits and still-life images, as you see here. It was a good way of exploring the capabilities of the film and exactly how it would look with certain subjects under various conditions. Here it really bought out the subtle textures of the seedpods.
I then printed the image on Ilford Multigrade IV fibre-based paper, and sepia-toned it using an odourless thiocarbamide toner. This produces a sandy-coloured image rather than the pinky-brown of the sulphide option. Sepia toning is a lot more simple than people think and these images last for a very long time. It’s a great process and one that I wish more people would explore.
Andrew Sanderson was talking to Oliver Atwell

If you would like to read more about paper negatives, Andrew’s book Paper Negative Photography is available from www.blurb.com, price £15