When 35mm cameras arrived, focus was at first achieved by an accessory rangefinder fitted in what we now regard as the flash hotshoe on the top-plate. After establishing the subject’s distance, it was set on the lens.
 Zeiss Contax then began to build the rangefinder into the camera body, coupling it to the lens, and speeding up focusing. This method became standard – and remains so today – on what are known as coupled rangefinder, or CRF, cameras. The Leica M series and Japanese Voigtländer cameras are the leading examples.
Focus is achieved by turning the lens control ring: in some CRFs, the aim is to superimpose two views of the frame centre; in others, it is to align two views split across the middle. Most of the world’s iconic photographs – those that symbolise an era or stay in the memory – were taken with this type of camera. The subject is composed directly through an optical viewfinder, rather like a reversed telescope.
Some people believe this involves the photographer in the subject more than with a single-lens reflex camera, which momentarily blacks out the view. Most compact cameras also feature direct vision optical viewfinders, but these do not have the same viewing quality of an SLR.
Supporters of CRF and SLR types continue to debate. But taking a common-sense attitude, there’s little doubt that CRF works best with lenses of 35-90mm or perhaps even to 135mm. Shorter focal lengths need a supplementary viewfinder to show the wider angle of view. The longer focal lengths mask off too much of the viewfinder frame or need a magnifier to show it usefully. The 35mm, 50mm, 90mm and 135mm range is, however, the one used most by journalists and reportage photographers who like to work close in.
Yet a system that allows a lens of any focal length to be attached, and which fills the viewing frame with exactly what will appear in the recorded image, is perhaps always going to have greater appeal.
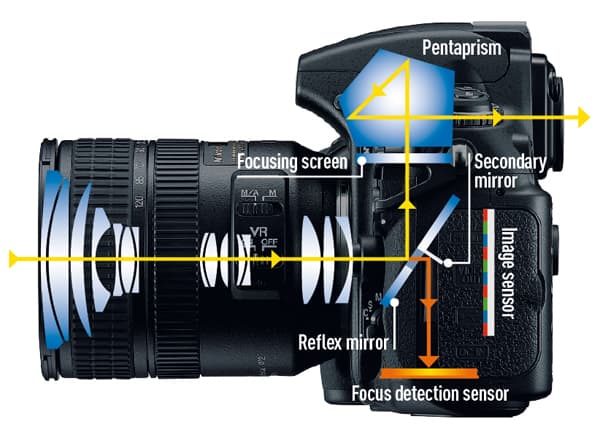
That is what the single-lens reflex camera does. The light travels through the lens and strikes a mirror angled at 45°C, reflecting the image up on to a screen. The overall distance from lens to screen is identical to that of lens to film or sensor. Therefore, any adjustments to focus on the screen correspond exactly to those that will be recorded in the image plane. When the shutter is released, the mirror momentarily flips up and out of the way, allowing the picture to be taken.

Image: The rays from the lens strike the reflex mirror and project upwards onto the focusing screen. This image is made upright and the right way round by the pentaprism, and viewed through the ocular lens. A part-reflective area of the reflex mirror allows a proportion of light to pass through to the secondary mirror, which reflects it down to the focus-detection sensors. The motor drives the lens to focus, the two mirrors swing up and the shutter is released, allowing all the light from the lens to reach the image plane.
Modern autofocus
Modern SLRs – a term that includes digital SLRs (DSLRs) – have the centre of the reflex mirror only half-silvered (or rather, half-reflectant).
This allows the rays from the lens to be split. Part is reflected up to the focusing screen while the rest goes through. There it meets a smaller, secondary mirror, which reflects the rays into the base of the camera’s dark chamber. There, detectors placed in the optical equivalent of the film or sensor plane can assess its sharpness and start the autofocus ability of the lens, or measure its strength and set the exposure.
Automatic focusing is a great step forward. For most work, the single-shot AF mode will work best. I was bred on cameras, whether CRF or SLR, in which you focus in the centre of the screen before reframing to compose the subject. Therefore, I usually choose a single autofocus zone in the centre or just above it, so that operation is the same. I don’t particularly want to interrupt my watching the subject by switching zones.
With more time and the camera in a fixed position, switching can often be helpful. On the other hand, when very close-up, it can be easier and more accurate to switch to manual focus.
Continuous or ‘servo’ automatic focusing comes into its own with moving subjects. The speed of modern chips allows the lens to remain focused on the subject as its distance changes and the camera is moved. Hence, it is also called ‘predictive’, ‘follow focus’ or ‘tracking focus’. You may find that if used on normal subjects it can get in the way, disturbing a focus set with quite small movements of the camera.
Live View
 The latest chapter in the focusing saga is Live View. To my mind, the ability to inspect in real time the image as it will be recorded, brings the advantages of a large-format camera with its ground-glass screen to the SLR.
Plus, the ability to selectively magnify sections of the frame and manually adjust focus really brings the little cameras of today into focus as fully viable instruments.
Focus is the centrepoint of interest in a picture, but the next most important tool is the control of depth of field – how sharp subject areas appear both in front of and behind the subject. As always, it is those photographers willing to experiment who master the skills. Digital imaging allows us to experiment without cost.
Predictive focusing

1. The camera computer calculates the position the subject will reach by the time the exposure can be made, taking into account the delay while the reflex mirror rises

2. The drive motor moves the lens focus movement to give sharp focus at the predicted subject position

3. As the exposure sequence starts, the reflex mirror rises

4. The shutter runs just as the subject reaches the predicted position, making the exposure
Predictive AF

Image: Predictive AF enables the camera to adjust the focus of the lens to follow a moving subject as its distance from the camera changes. Though it is not infallible, when it works it results in a sharp sequence of images like these captured using a Nikon D300 and an 80-200mm f/2.8 lens.
Test your AF limit
In a room where the ceiling and walls are of a similar colour, try focusing on the angle where they meet, first manually and then with autofocus. Repeat in poorer and poorer light to find the AF limit, and see whether it’s better than your eye.
Test your AF speed
With the lens cap on, manually set the focus to infinity, then switch to auto. Half press the shutter release and the lens focusing will move rapidly to its closest distance – and possibly back again to infinity. Some lenses prefer to start from the closest focus. This shows how fast the AF moves and allows comparisons to be made with other lenses.
Test the displacement between the viewfinder image and AF zone display
Try autofocusing using the central zone on a small black & white cross about the same size as the zone in the finder and pinned to a stick in the garden. If the cross records out of focus and the distant objects are sharp, it means the viewfinder image is displaced relative to the AF zone display – which is something worth knowing.
The optical rangefinder remains a most – some would maintain the most – accurate means of focusing. Single-lens reflex focusing introduces several variables, not least human error – and nowadays, autofocus error.
It is known that visual focusing accuracy falls off steadily – it’s tiring if exercised continuously as a press photographer may do, working all day. On the other hand, the ability to superimpose two images of a subject area or align a horizontal split does not deteriorate in the same way.
Furthermore, according to the eyesight of the user, there can be a tendency to ‘see through’ the small focusing screen on a miniature camera, so that focus goes behind the desired plane. This has been a recurring problem with users of twin-lens reflex cameras who are short sighted.
The miniature screen on a 35mm film SLR, as with its full-frame, APS-C sensor – and smaller – successors, is clearly inadequate if unaided.
Much improvement has been made through techniques such as laser etching of the focusing screen, which gives the light-diffusing surface finer and more evenly distributed components.
The microprism, a centre circle populated with tiny prisms, has been very popular. Only when the image is in focus does it clarify across the microprism area. But the difficulty is that the angle of the tiny prisms needs to be optimised for the focal length of the lens in use. Outside the medium focal length range, say 35-105mm, they tend to blacken over. That is why top system SLRs offer a number of interchangeable focusing screens. Some are dedicated to use with very wideangle and telephoto lenses. But swapping screens in the field is not a recommended exercise.
To give something of the CRF’s advantage of independence from eyesight errors, screens have been developed with an annular, or ring, of microprisms, with crossed-wedges in the centre as an additional aid. This gives a split-image to align, but is even more focal-length dependent.
Ultra-sonics and infrared
Before dealing with the system that truly paved the way ahead for the SLR – including the DSLR – two others should first be mentioned: the use of ultra-sonics and infrared.
Some Polaroid Land camera models use an ultra-sonic pulse whose return time determines the subject’s distance and so the focus position of the lens. An infrared subject scanning means is used in several compact cameras.
Deep red and IR light are also used in some SLRs as an aid to autofocus in poor light. It projects a random pattern, having sufficient contrast for the AF optical system to pick it up and set focus.
Active and passive
The simplest method of machine detection of focus is that used by Canon in its 1963 photokina demonstration of a prototype camera. It depends on the fact that output from a CCD peaks when an in-focus image is beamed onto it.
Later, the principle was developed further into the form now used, with variations, by many compact viewfinder cameras.
Using three sensors works most efficiently, though the system can work with only two. The central sensor is sited at the exact distance equivalent of the camera image plane. One of the others sits beside it, a little in front of the image plane. The third – on the other side – is similarly behind the image plane. The output from the three is analysed by the camera’s computer.
There is a difference between the fingerprint of blur from focus in front of the subject and that from focus behind it. With this data it is able to move the lens focus until the peak output comes from the central sensor. When using two sensors, one is placed just ahead of the optimum focus, the other just behind.
Some less expensive cameras do not have continuous distance setting. Instead, there are a number of focus zones between closest and infinity – anything from 8-30. The autofocus then brings the lens focus to the appropriate zone, relying on depth of field to give satisfactory sharpness.
Focus rangefinding
 Image: The two sensor arrays replace the human eye. The moving mirror linked to the focusing movement of the lens reflects the image via a mirror and lenslet. When the image on one sensor exactly matches that from the other fixed mirror on the other sensor, focus is achieved and the focusing movement of the lens ceases
Contrast
‘Contrast’ is the focus point criterion, whether you use the human eye or let advanced technology do it for you.
The only methods that do not depend on it are the ultrasonic and IR pulse systems. They enable a focused flash shot to be taken in total darkness without warning – although not through glass if using ultrasonics. Systems that involve the emission of a pulse towards the subject are termed ‘active’ systems.
Those that use light reflected from the subject are termed ‘passive’. Standard AF in an SLR is passive. Deep red, IR AF assist systems are ‘active’.
The method of subject area or motif focusing universally used in modern SLRs is known as phase detection, or matching. In essence, it is related to visual split-image coupled-rangefinding.
The rays coming from the exit pupil of the lens are split into two beams. Small lenses focus these on two photosensors containing numerous – at least 128 – separate detection sites. They are located in the base of the camera and receive light via a secondary mirror behind the reflex mirror. A semi-silvered section allows this to happen. Just as in crossed-wedge visual focusing, the base separation of the rangefinder ‘windows’ is the diameter of the lens exit pupil – effectively at its maximum f/stop. That is why most AF systems need an aperture of f/4 minimum to work.
Only when the image of the motif to be focused occupies the same central position on both sensors – when the two are ‘in phase’ – will it be sharply focused in the camera image plane.
Once that phase matching is achieved, the motor driving the lens focus movement stops.
There are several variants of the basic method. A smaller or greater number of AF zones can be provided by increasing the AF sensor’s area and allowing particular groups of photosites to be user-selected.
A number of zones is necessary for predictive or follow focus AF to allow the speed and direction of a moving subject to be assessed. In order to detect focus on motifs at any angle from horizontal to vertical, additional sensors are provided, often in an ‘H’ pattern.
Nowadays, the data transmission from detectors to the focus drive motor is digital and the subject distance information may be passed on to assist the exposure setting system. This application was pioneered by Nikon.
Phase detection
Film and digital SLRs use the phase-detection system of automatic focusing.
A proportion of the rays coming through the lens pass through a semi-silvered section of the reflex mirror and are deflected down into the base of the camera. There, two lenses, sited just behind the geometrical equivalent of the image plane, form separate images on a two section sensor.
If the current focus of the lens is in front of the required subject plane, the two images will be displaced outside the centre lines on their sensor sections. If focus is currently nearer than the required plane, both images will be within the centre lines.
The camera computer rapidly calculates the focusing movement needed to bring both images to their sensor centre lines and activates the AF motor to drive the lens to this focus.
All this happens in a fraction of a second
Anti-hunting
In practice, to prevent overshoot and hunting, two measurements are made.
The first predicts from the degree of perceived unsharpness how far the focus movement will have to be driven. The motor starts and a second check is made at the predicted focus point. If all is well, the focus locks and – if in single shot mode with shutter linked – the release button can be fully depressed to make the exposure.
The speed of autofocus is assisted by designing lenses to have low mass focusing sections with a short travel over the distance span. In practice, this means having ‘internal’ focusing: the movement of an optical group inside the lens.
Conclusion
Automatic focusing systems are not infallible, as I have found when testing lenses for AP.
Like the eye, they depend on the subject being of sufficient contrast to determine a sharpness point in the lens focus travel. This may occur in bright light, not only in poor light.
The failure point also depends on the lens design, not only on maximum aperture but also on how rapidly the out-of-focus planes lose shape. The smooth loss of shape that bokeh enthusiasts like can make AF lock on just either side the optimum. The defocus is not visible in the finder, but is apparent when later enlarging the image.
Another source of error occurs when the camera’s finder frame is displaced relative to the photographic one. Then, focusing on a small area located at a zone in the finder can result in another plane – usually behind it – being sharp. In lens testing I use a large cross to focus on either by AF or manually before making the exposures on the target.
Despite the limitations of ‘machine’ focusing, viewed overall and in experienced hands it is likely to produce a greater number of hits than the human eye. It does not tire and is independent of eyesight defects and variations.
But that does not mean we should stop focusing visually when more appropriate, as in close-up work. I am very enthusiastic about Live View, and the ability to see the precise frame, focus point and field depth that will be recorded. Coupled to a digital magnifier facility, it brings miniature cameras – full-frame and smaller – much nearer to the kind of control that users of medium and large-format cameras have always enjoyed.