Photo Insight with Andrew Sanderson

A renowned photographer, tutor, author and Ilford Master Printer, Andrew Sanderson offers practical tips on working with film and traditional darkroom techniques
As a photographer, one of my primary concerns is the representation of light within my images, or, to be more specific, the absence of light. I’d say that’s where my main interest lies – in the shadows. When you’re studying photography, you are told time and again that you should always work out your exposures so you retain plenty of shadow detail. However, I often find that having a deep shadow or, in some cases, an opaque block of black, leads to a much stronger image. Using shadows creatively can impart a powerful compositional element – the black areas lend balance and strength to an image.
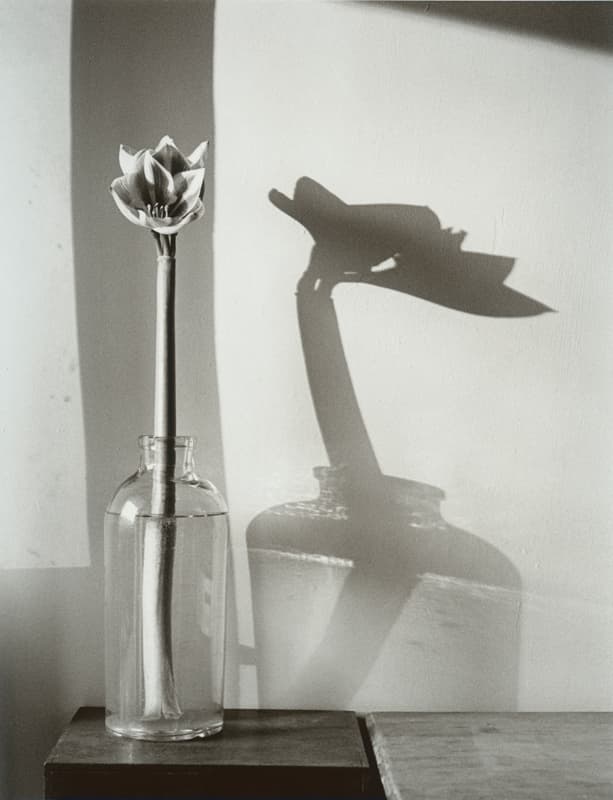
This picture of an amaryllis flower in a glass bottle was taken in a house I lived in a number of years ago. It was a beautiful old cottage and the walls were covered in a thick, uneven plaster. When the light from the sun shone into the house, the shadow of the doorframe would distort as it raked across the wall.
At the time this image was captured, I was very much into taking shots of flowers and flower heads, and I had bought this amaryllis with the intention of taking a close-up. It was in a large clear-glass chemical bottle and I placed it near the door. As the light of the sun moved around the house, it spilled through the window and I placed the bottle and flower in the light to see how the shadow looked.
I was immediately taken with how the shadows stretched out across the wall, so I quickly set up my Mamiya RB67 to get the shot. It was about this time that my friend turned up, stood right in the doorway and started chattering about something. I had to tell him to move and get out of the way of the light. There was a huge risk that the sun would move too far round and I would lose the alignment of the light, bottle and doorframe’s shadow. My friend got out of the way and I managed to get the shot you see here.

The image was taken using Ilford HP5 film and developed in Ilford ID-11 chemistry. I then scanned it and printed it on Ilford Warmtone FB paper. I prefer to print my images in the darkroom and then scan the print rather than scanning from the negative. In that way I can get the look I want and be sure it turns out the way I intended.
The amaryllis in a bottle picture is one of my favourites. As I’ve said, I have been drawn to shadows and distortions for many years and have a large body of work with those elements running through it. The subject matter has been eclectic, from still life, through botanical and even night shots. Shadows can lead the eye into or around an image without distracting from the main subject. They can also impart mood and drama.
Getting a deep-black shadow area with film could be achieved by underexposing slightly, although I prefer to expose normally and to increase the blacks during printing by using Grade 5 filtration in the enlarger head after the ‘normal’ exposure. This will gradually deepen the shadow detail, depending on how much extra exposure you gave it. If you’re working in Photoshop, it’s a simple matter of moving the left-hand slider in levels (Image>Adjustments>Levels) until the chosen density is achieved.
To be able to spot a shot like this you need to be more aware of the shadows than the scene itself. To do this, I find that, while looking at a potential scene, I squint my eyes. It sounds strange, but it really helps. When you half-close your eyes you reduce the intensity of the light to the point where the darker tones don’t register and appear as solid blacks. You are then free to assess the strength of those shapes and how they will slot into the overall composition of your final shot.
Andrew Sanderson was talking to Oliver Atwell
 If you would like to read more about paper negatives, Andrew’s book Paper Negative Photography is available from www.blurb.com, price £15